usage.cn
You can install webpack via npm: 你可以通过 npm 安装 webpack:
npm install webpack -g
Note: We’re installing webpack globally for demonstration purposes. When you are building a real application, it’s more advisable to install webpack as a
devDependencyof your project.
注意:全局安装 webpack 只为展示用。当构建一个真实应用时,更明智的是将 webpack 作为项目的
devDependency安装
First, we’ll learn the basics of webpack by using just webpack’s command-line interface. 首先,通过使用 webpack 的命令行接口学习 webpack 的基础。
Let’s create some modules in JavaScript, using the CommonJs syntax: 使用 CommonJs 语法 创建几个 JavaScript 模块。
cats.js
var cats = ['dave', 'henry', 'martha'];
module.exports = cats;
app.js (Entry Point)
cats = require('./cats.js');
console.log(cats);
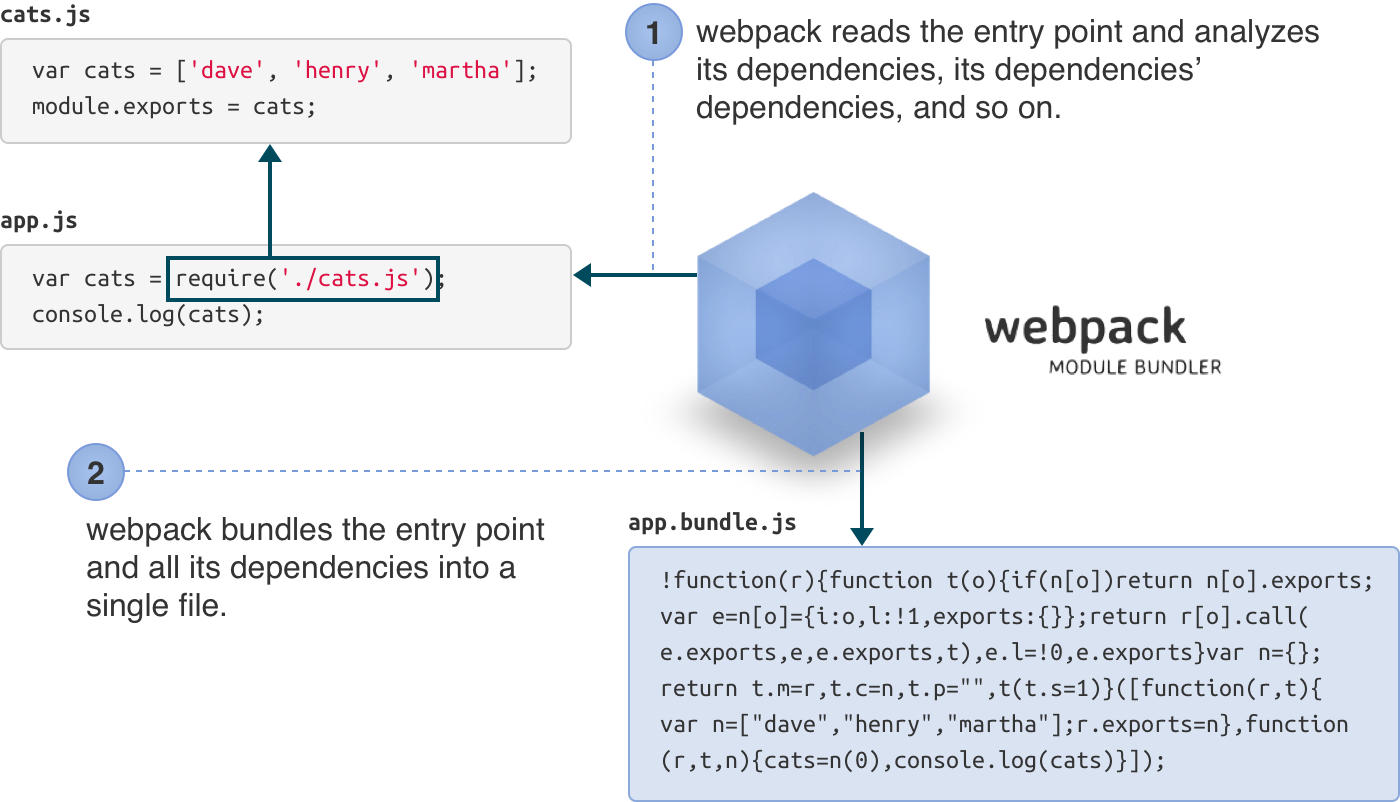
The "entry point" is where your application will start, and where webpack will start tracking dependencies between modules. 入口点就是你的应用开始运行的地方,也是 webpack 追溯模块间依赖的开始位置。
Give webpack the entry point (app.js) and specify an output file (app.bundle.js): 向 webpack 提供 入口点(app.js)并指定输出文件(app.bundle.js):
webpack ./app.js app.bundle.js
webpack will read and analyze the entry point and its dependencies (including transitive dependencies). Then it will bundle them all into app.bundle.js.
webpack 会读取并分析入口点及其依赖(包括传递性依赖)。然后它会将所有模块打包进app.bundle.js。
Now your bundle is ready to be run. Run node app.bundle.js and marvel in your abundance of cats.
现在,bundle 已经可以运行。运行node app.bundle.js,你会奇怪猫太多了。
node app.bundle.js
["dave", "henry", "martha"]
You can also use the bundle in the browser. 你也可以在浏览器中使用 bundle。
webpack is a very flexible module bundler. It offers a lot of advanced features, but not all features are exposed via the command-line interface. To gain full access to webpack’s flexibility, we need to create a “configuration file.” webpack 是一个非常灵活的模块打包工具。它提供了大量高级特性,但不是所有特性都通过命令行接口暴露出来。为了访问 webpack 全部的灵活性,我们需要创建一个“配置文件”。
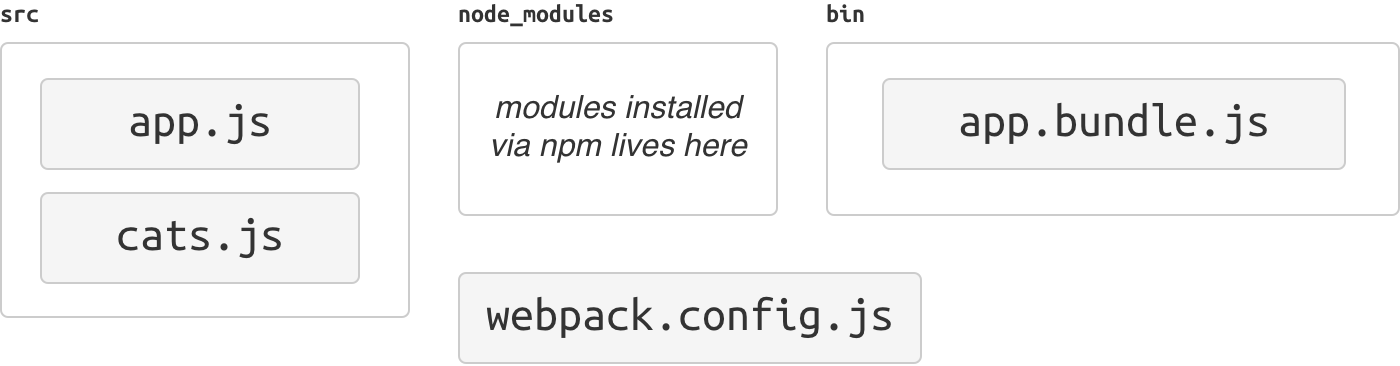
In real-world webpack projects, we’ll separate the source files from the bundled files by organizing them in folders. For this example, we’ll put the source files in src, and bundled files in bin. 现实中的 webpack 项目,我们会通过目录组织将源文件与打包生成的文件隔离。例如,将源文件放在src目录,打包生成的文件放在bin目录。
Our final project structure will look like this: 我们最终的项目结构看起来像这样:
In the wild, there are many project structures. Some projects use
appinstead ofsrc. Some projects usedistorbuildinstead ofbin. Projects with tests usually usetest,tests,spec,specsor collocate the test files in the source folder.
业界中存在多种类型的项目结构。有些项目使用
app而不是src。有些使用dist或build而不是bin。拥有测试的项目通常使用test,tests,spec,specs或者将测试文件放在源码目录。
-
Create the
binandsrcdirectory. -
创建
bin与src目录。mkdir bin mkdir src -
Move the original source files to the
srcfolder. -
将源文件移入
src目录。mv app.js cats.js src -
Initialize an npm project.
-
初始化一个 npm 项目。
npm init # (answer the questions) -
Install webpack as a development dependency. This lets your project declare the version of webpack it is compatible with.
-
将 webpack 安装为
devDependencies。这使你的项目声明了 webpack 的版本以保证兼容性。npm install --save-dev webpack
As your project grows and your configuration becomes more complex, it becomes unwieldy to configure webpack from the command line. Let’s create a configuration file instead. 随着你的项目演进和你的配置变得更复杂,从命令行配置 webpack 是不明智的。创建一个配置文件吧。
-
Create
webpack.config.js: -
创建
webpack.config.js:module.exports = { entry: './src/app.js', output: { path: './bin', filename: 'app.bundle.js' } };
A webpack configuration file is a Node-style module. So you can run any kind of code here, as long as a configuration object is exported out of this module.
一个 webpack 的配置文件就是一个 CommonJS 风格的模块。所以你可以在里面运行任意代码,只要此模块输出一个配置对象即可。
-
With the configuration file in place, you can now simply run webpack like this:
-
准备好配置文件后,你现在只需像这样运行 webpack:
webpackwebpack will read the configuration file, build the bundle, and save it as
bin/app.bundle.js. If you examine webpack's output you'll see that it included both source files.webpack 会读取配置文件,构建 bundle,并保存为
bin/app.bundle.js。如果你测试一下 webpack 的输出,你会看到源文件都被包含进输出文件了。 -
Run
bin/app.bundle.jsand you'll get your list of cats again. -
运行
bin/app.bundle.js,你会再次得到你的猫咪组合。node bin/app.bundle.js ["dave", "henry", "martha"]
You can also
require()modules installed via npm with no extra configuration.
你也可以无须额外配置,
require()通过 npm 安装的模块。
webpack only supports JavaScript modules natively, but most people will be using a transpiler for ES2015, CoffeeScript, TypeScript, etc. They can be used in webpack by using loaders. webpack 原生只支持 JavaScript 模块,但大部分人会为ES2015、CoffeeScript、TypeScript等使用转译器。他们可以通过loaders在 webpack 中使用。
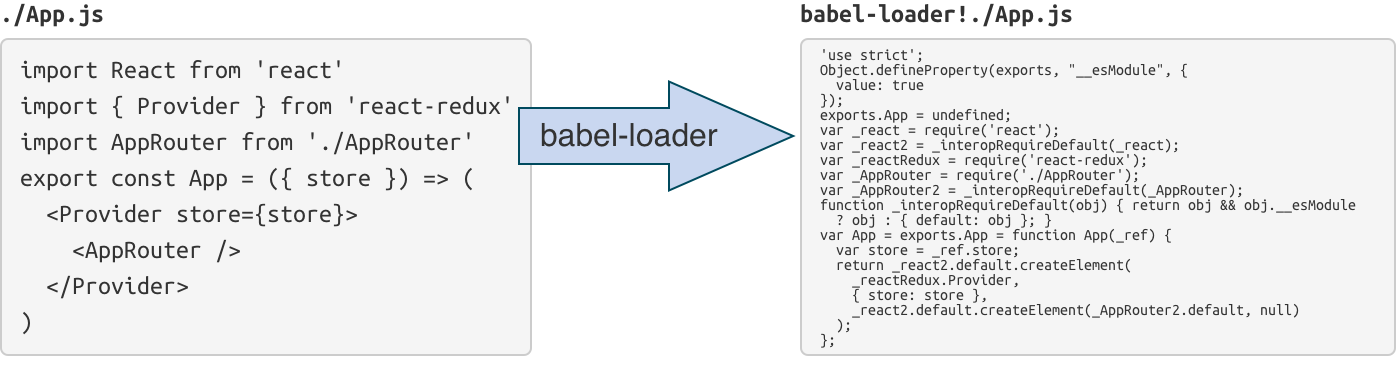
Loaders are special modules webpack uses to 'load' other modules (written in another language) into JavaScript (that webpack understands). For example, babel-loader uses Babel to load ES2015 files.
loader 是一些特殊模块,以便 webpack 用来将其他模块(用其他语言编写)‘加载’成 JavaScript(webpack 理解的)。例如,babel-loader使用 Babel 来加载 ES2015 文件。
json-loader loads JSON files (simply by prepending module.exports = to turn it into a CommonJs module).
json-loader 加载 JSON 文件(只是简单地在开始加入module.exports =来将其转换为CommonJS模块)

Loaders can be chained, and sometimes you need to chain loaders together. For example, yaml-loader only converts YAML into JSON. Therefore, you need to chain it into json-loader so that it can be used.
loader 可以被串联使用,有时你需要将一些 loader 串联一起使用。例如, yaml-loader只会将 YAML 转换为 JSON,因此,你需要将其串联到json-loader以便可用。

In this example, we're going to tell webpack to run our source files through Babel so we can use ES2015 features. 在这个例子中,我们将要告诉 webpack 用 Babel 把源文件处理一下,以便我们可以说你用 ES2015 的特性
-
Install Babel and the presets:
-
安装 Babel 及其预设特性集合:
npm install --save-dev babel-core babel-preset-es2015 -
Install
babel-loader: -
安装
babel-loader:npm install --save-dev babel-loader -
Configure Babel to use these presets by adding
.babelrc -
通过添加
.babelrc配置 Babel来使用预设:{ "presets": [ "es2015" ] } -
Modify
webpack.config.jsto process all.jsfiles usingbabel-loader. -
修改
webpack.config.js来使用babel-loader处理所有js文件。module.exports = { entry: './src/app.js', output: { path: './bin', filename: 'app.bundle.js', }, module: { loaders: [{ test: /\.js$/, exclude: /node_modules/, loader: 'babel-loader', }] } }
We are excluding
node_moduleshere because otherwise all external libraries will also go through Babel, slowing down compilation.在这我们排除了
node_modules,否则其他外部库都会被 Babel 处理,减慢 compilation。 -
Install the libraries you want to use (in this example, jQuery):
-
安装想要用的库(此例中,jQuery)
npm install --save jquery babel-polyfillWe are using
--saveinstead of--save-devthis time, as these libraries will be used in runtime. We also usebabel-polyfillso that ES2015 APIs are available in older browsers.这次使用
--save而不是--save-dev,因为这些库会在运行时使用。我们也使用了babel-polyfill以便 ES2015 的 API 在旧版浏览器中可用。 -
Edit
src/app.js: -
编辑
src/app.js:import 'babel-polyfill'; import cats from './cats'; import $ from 'jquery'; $('<h1>Cats</h1>').appendTo('body'); const ul = $('<ul></ul>').appendTo('body'); for (const cat of cats) { $('<li></li>').text(cat).appendTo(ul); }
-
Bundle the modules using webpack:
-
用 webpack 打包模块:
webpack -
Add
index.htmlso this app can be run in browser: -
添加
index.html,因此此应用可运行在浏览器:<!DOCTYPE html> <html> <head> <meta charset="utf-8"> </head> <body> <script src="bin/app.bundle.js" charset="utf-8"></script> </body> </html>
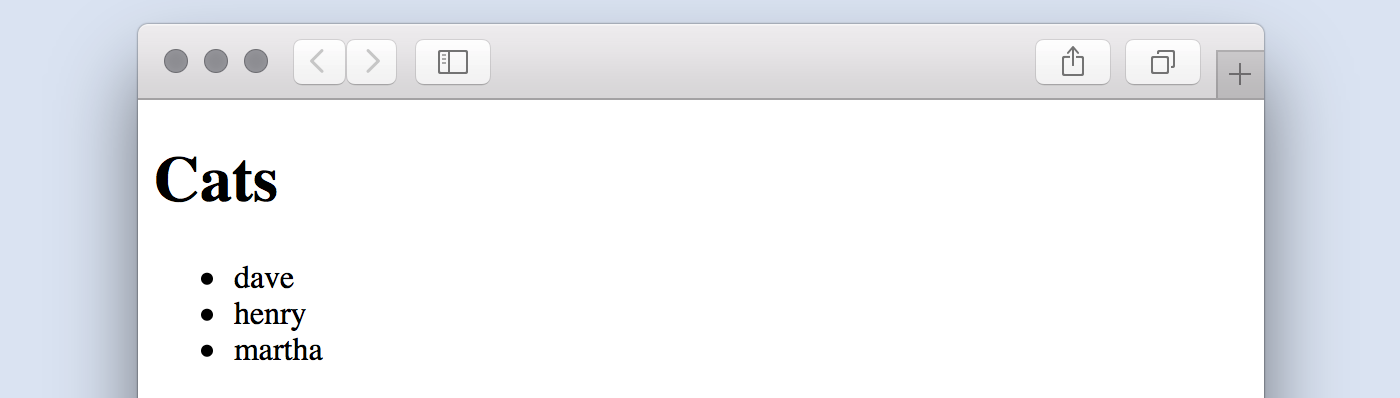
When you open index.html, you should now see a list of cats!
当你打开index.html,你应该会看到猫咪组合。
There are a number of different loaders you can use to include files in your app bundle, including css and image loaders. 存在很多功能各异的loader。你可以用来将文件包含到 bundle 中,包括 css 与 图像 的loader。
Usually you'll want to do some additional processing of the bundle in your workflow. An example would be minifying your file so that clients can load it faster. This can be done with plugins. We'll add the uglify plugin to our configuration:
通常你会想要针对自己的工作流对 bundle 做些额外处理。例如可以是压缩文件以便客户端可以更快加载。这个可以通过插件完成。我们会向配置加入 uglify 插件:
const webpack = require('webpack');

module.exports = {
    entry: './src/app.js',
    output: {
        path: './bin',
        filename: 'app.bundle.js',
    },
    module: {
        loaders: [{
            test: /\.jsx?$/,
            exclude: /node_modules/,
            loader: 'babel',
        }]
    },
    plugins: [
        new webpack.optimize.UglifyJsPlugin({
            compress: {
                warnings: false,
            },
            output: {
                comments: false,
            },
        }),
    ]
}
The Uglify plugin is included with webpack so you don't need to add additional modules, but this may not always be the case. You can write your own custom plugins. For this build, the uglify plugin cut the bundle size from 1618 bytes to 308 bytes.
Uglify 插件是 webpack 自带的,所以你不需添加额外模块。但不一定一直是这样的情况。你可以编写自定义插件。对于这次构建,Uglify 插件将 bundle 的文件大小从 1618 字节削减到 308 字节。
-
see CLI for the command line interface.
-
see node.js API for the node.js interface.
-
see Configuration for the configuration options.
-
命令行接口参见CLI
-
node.js接口参见node.js API
-
配置选项参见Configuration